About Ningiu

Ningiu is the Greenlandic word for grandmother, since I'm part Greenlandic and because handicraft reminds me of my grandmother and mother I find the name appropriate.


Viser opslag med etiketten tutorials. Vis alle opslag

fredag den 16. juli 2010

A winner and a quick tutorial

Thank you for your comments!!
I'm so glad I'm not the only one here :-)

And the winner is:
Jenny with number 2, I'll contact you shortly!

And for the rest of you, I'll show you a handy little finger-pincushion tutorial:

Start with a 4,5" inch square (I used a 5" square, and it turned out just a little too big)

Fold it into a triangle, with right sides together.

Stitch along the open edges, leaving a little gap for turning and stuffing.
Turn, and fill stuffing through the little gap, stuffing it firmly in the middle, and leaving the sharper points unstuffed.


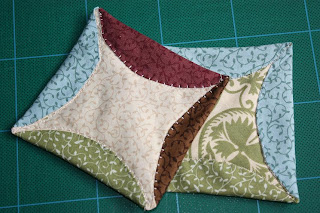
Blind or slipstitch the oppening together.
Gather the two sharp points making them slightly ovelap.
Stitch them together forming a ring
And there you have a fancy little pincushion always nearby.

I would love to know if you use this tutorial, or if you have any questions or comments :-)
By the way, do any of you know how to stop spam comments, I've been getting quite alot lately, and think they are really annoying!!!
Take care.
Isa

torsdag den 18. juni 2009

two in a row coaster tutorial, part 2

For this coaster you’ll need
- five pieces of fabric 5 inch square
- one piece of fabric 4 inch square
Fabric number 5 is the backing fabric, and fabric number 6 is the center fabric.


Press fabric number 1-4 right sides together to make triangles.


Lay the triangles in the four corners on the right side of fabric number 5.


Flip over fabric number 4, so that fabric 1-4 is visible

Pin heavily, stitch and trim. I use pinking shears.


On the wrong side of the stitched and trimmed square, glue or pin fabric number 6 and the square wrong sides together.


Turn and press the square.
Front
Back


Fold the edges and pin them down.


Stitch the edges down, lifting and stitching a bit under the next edge.


Repeat with all four edges, and voila!


If you make a coaster using this tutorial I would love to know.
Thank you.

two in a row coaster tutorial, part 1


For this coaster you’ll need 3 templates

- One 4 inch square, this will be your finished size.
- One circle 5 ¾ inch in diameter, or a circle slightly bigger than your small square.

- One 6 ½ inch square, or a square big enough to fit your circle, this is the template you need for cutting your fabric.


If you’ll be using this template numerous times I recommend you cut it out in template plastic.


You’ll need two pieces of fabric, one for the front and one for the back both 7 inch square, and a piece of batting 7 inch square. I’ll recommend that there is some contrast between the fabrics. In this way the pattern will be more visible.


Start by cutting out the biggest square in both batting material and in front and back fabric,

the backing fabric will be the rounded edges on the front of the coaster.


Make a sandwich with front and back fabric right sides together. Place this on top of the batting.


Trace the circle onto the fabric.


Stitch around the marked circle leaving and opening for turning.


Trim as close to the seam line as possible, I use pinking shears.


Turn and press the circle, remembering to press the openings raw edges inside.


Using the 4 inch square as guide press the circles edges towards the center.
Don't use the plastic template for this, only use cardboard or paper templates when pressing.


Stitch down the rounded edges, and voila!


If you are a bit nifty, you can make the edges in different colors. (and if you do it without a nine month old on one arm, you could probably stitch it better :-)


If you make coasters using this tutorial I would love to know.
Thank you

My first tutorial.

Getting ready for my first tutorial.... Yay :-)